I feel a bit bad about calling my creation 'ugly', but the sad truth is in the Twittersphere it's all the pretty, flashy or artsy images that get the most attention, and Adventures was 'Plain Jane' by comparison. With good reason - it's supposed to be simple so anyone can play and so it can run on the widest range of mobile devices. But there's no denying the flat lighting and constant greyness filling the screen presents a poor impression. I was always going to add some sort of lighting for things like torches, but finally decided I had set about making the change now and...
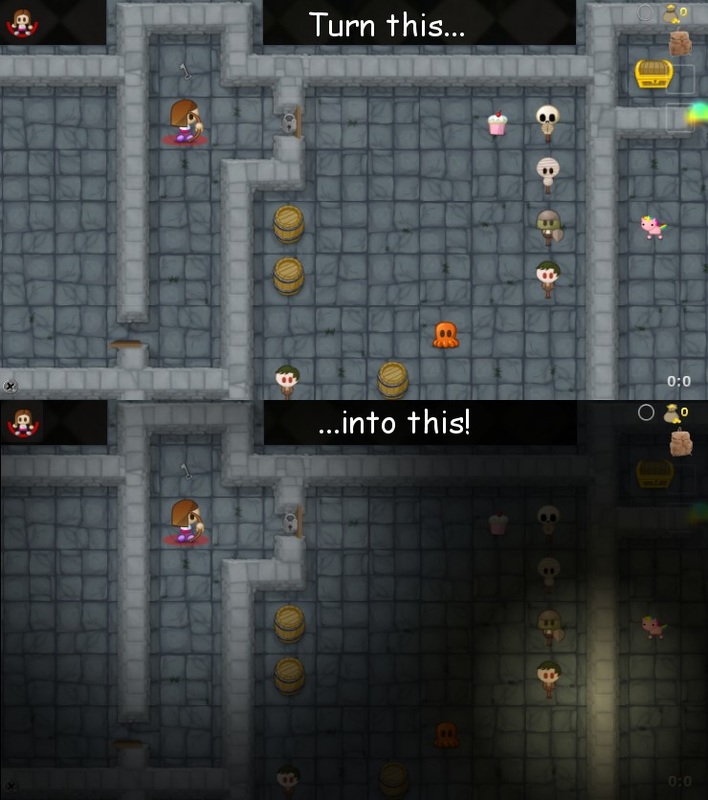
The aesthetic is far better, adding atmosphere and variety, and also allowing for some gameplay elements managing lights. The question was 'how?' I looked on Unity's Asset Store to see if someone was selling a suitable solution, but they were all trying to do too much which mobile isn't suited for. So I thought I'd make my own, and it turns out it was really easy!
Here's how you do this in Unity3D:
Quite often things can take far longer than you expected to implement. Adding doors took a while! And then the result is hardly anything. So it's a rare satisfaction to savour when something as significant as a major visual upgrade is achieved in such a straight forward way!
I'm now going to make it a 'proper' system with parameters for light size, brightness, bit of animation, etc. this way the lights can become part of the game. How about one level where the only light sources are on the monsters attacking you...?
UPDATE:
An issue came up with the scaling of the quad playing nice with the aspect and zoom of the camera, causing the lights to drift when the camera was moved. Just needs a little maths to scale the quad, and to use a square camera drawing to a square quad. This code is added to my camera control script that also handles zoom, backdrop scaling, etc.
- Create a new layer for Light Areas.
- Create a new camera matching your main camera for drawing lights, and set this to only draw the Light Areas layer (Culling Mask) and clear to a solid black colour. Set the main cam to not draw the Light Areas layer. Set the new camera's Draw Order lower than your main camera (typically -1).
- Add a sprite to every light source, alpha blended. Use a graphic for the area light effect, so just a soft round spot. Set its layer to 'Light Areas'.
- Create a RenderTexture asset in your project panel.
- Assign this RenderTexture as the Target Texture for the Light Area camera.
- Create a quad that matches your main camera.
- Create a new material of type Particles/(Mobile/)Multiply, set it's texture to your RenderTexture and apply it to this quad.
- Position the quad between main camera and everything else.
Quite often things can take far longer than you expected to implement. Adding doors took a while! And then the result is hardly anything. So it's a rare satisfaction to savour when something as significant as a major visual upgrade is achieved in such a straight forward way!
I'm now going to make it a 'proper' system with parameters for light size, brightness, bit of animation, etc. this way the lights can become part of the game. How about one level where the only light sources are on the monsters attacking you...?
UPDATE:
An issue came up with the scaling of the quad playing nice with the aspect and zoom of the camera, causing the lights to drift when the camera was moved. Just needs a little maths to scale the quad, and to use a square camera drawing to a square quad. This code is added to my camera control script that also handles zoom, backdrop scaling, etc.
 RSS Feed
